(Featured image by Toa Heftiba on Unsplash)
I’ve been cross stitching since I was a child, and it’s such a fun hobby, which always results in beautiful works of art to admire in your home or gift to a friend to display in their home.
But what if you want to wear your cross stitch art everywhere you go..? Having someone ask where you got an item of clothing, and being able to reply “I made it!” is such a satisfying experience.
Here are 6 ideas to DIY items of clothing you probably already have with cute cross stitch motifs.
1. Add a cross stitch motif to a tote bag
Everyone loves a tote bag, right? You can never have too many - they’re so handy for grocery shopping, rolling up in a smaller bag just in case for those out-and-about kinda days that you might end up buying something, or for an everyday shoulder bag.
Why not jazz up your tote bags with some cross stitch? You could cross stitch a large or small design depending on preference, or cross stitch a small motif like your initials.
Most tote bags are made from cotton canvas, which is really easy to cross stitch onto, especially when you use a water soluble canvas as a guide for where each stitch should go.
You simply tack the canvas to your tote bag with a few stitches, and complete your cross stitch. Once you’re finished, cut the tack stitches, submerge in water, and watch the canvas dissolve, leaving behind your cross stitch design.
2. Adorn a crossbody bag with cross stitch embroidery
Do you remember when that Uniqlo crossbody bag went viral? If that all passed you by, now that I’ve mentioned it, you’ll start seeing them everywhere.
The Round Mini Shoulder Bag quickly became Uniqlo’s best-selling bag of all time, selling out over and over again - they’ve since released it in more colours and different fabrics too, including a quilted nylon, corduroy, and crochet. It’s no surprise that there are also hundreds of dupes by this point too.
Uniqlo started offering an embroidery service in their Covent Garden store in London, so that customers could personalise certain Uniqlo items with words and images - you can see the embroidery machine in action in this video.
As an avid cross stitcher, you can do this yourself, and it doesn’t have to be a Uniqlo bag, it can be any crossbody bag you already own.
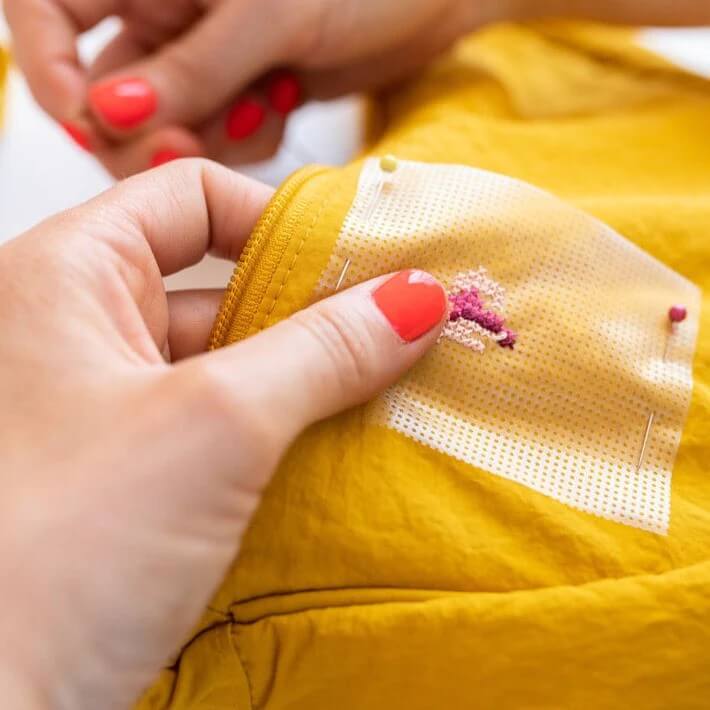
If it’s a pliable fabric, it’d be best to use an embroidery hoop along with a soluble canvas, to keep the fabric taught and help you create a neat cross stitch design.
Chloe from Cotton Clara made this great video of how to use soluble canvas to cross stitch onto a crossbody bag. She cross stitched an adorable rose design onto her yellow bag, and it looks great!

(Photo from Cotton Clara)
3. Jazz up your shoes with cross stitch
Another viral trend from the last few years was when lots of UK crafters cross stitched these shoes from Tesco - the shoes had tiny holes that were evenly spaced out, making them perfect for cross stitching.
I’m not sure if there are any shoes like that on the market right now (if you’ve seen some, please let me know on Instagram and I’ll pop them into this blog post), but you can cross stitch onto any fabric shoes.
Shoes such as Converse, Vans, or any others that are made out of a woven fabric are cross-stitch-able, and as with the previous 2 DIY ideas, you can use a water soluble canvas to make cross stitching much easier.
4. Sew a cross stitch design onto a denim jacket or jeans
Jackets and jeans with a cute embroidered design on the pocket are so cute, and it’s not that tricky to do, especially if you’re already an experienced cross stitcher.
Again, you can use a water soluble canvas, or you can use waste canvas to cross stitch onto denim, which is preferable if you want to create a large cross stitch design on the back of a denim jacket, as it’s more versatile, size-wise.
Waste canvas is a heavily starched, open-weave fabric that you can cut to the right size. You’ll need to tack onto the denim, much like when you’re using a water soluble canvas.
After you’ve finished your cross stitch design, you wet the fibres of the waste canvas to relax them, and pull the threads out, leaving your beautiful cross stitch intact.
5. Cross stitch onto a simple cotton t-shirt
Imagine a lovely soft t-shirt with your initials or a little floral motif cross stitched onto it - it would look so cute, and I’m sure we all have a few plain t-shirts lying around unworn that could be transformed into your new favourite top.
For cross stitching onto a t-shirt, I would use waste canvas with the same method as above, but with a smaller embroidery needle. T-shirt fabric is much thinner than denim, and you don’t want to risk creating holes.
6. Add cool cross stitch embroidery to a knitted beanie hat
A small motif or icon on the front of a woolly hat always looks cool, and you won’t even need soluble or waste canvas for this DIY, however a small drawing of your design on paper to refer to as you stitch is very handy.
As I mentioned in one of my previous blog posts (7 cross stitching fabrics, and how to choose the right one for your project) cross stitch works pretty well on knitted wool fabric, as the stitches and rows of knitting help distinguish where each cross stitch should go.
Perhaps you’d rather display your cross stitch projects in your home than wear them - keep an eye on the Meloca Designs blog, as I have a post coming up later this month with loads of creative ways to display your cross stitch art.
And if you’ve seen or made any amazing cross stitched clothing, please share photos with me as I’d love to see them. You can always DM me on Instagram, or join the Meloca Designs Cross Stitch Group on Facebook.

